Guerilla Gardening by Marcia Finical
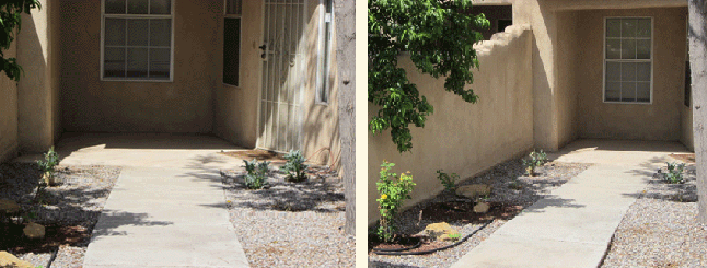
A couple of years ago, my neighbors packed up their stuff and left. No goodbyes, no “we’re coming back to pick up the stuff we can’t move today,” no nothing. They probably were victims of an over-zealous mortgage broker who saddled them with a mortgage that everyone secretly knew they couldn’t afford. As time went on the place starting looking like a squatter’s dream – the paint was peeling off the molding around the garage door, litter and leaves covered the front walkway and the two roses bushes were slowly dying.
I decided to take a step into the unknown world of Guerilla Gardening. For the uninitiated, Guerilla Gardening is where a gardener sees opportunity in any available space, legal or not. I cleaned up the front walkway and went to the Rose Society’s pruning demonstration where I learned what, where and how to prune. Not bad for somebody who doesn’t particularly like roses. I’d never gardened in a bed full of landscape gravel and was somewhat leery of it. After I pulled out the weeds,
I planted some Penstemon palmeri, the most drought tolerant penstemon available and a lavender. After all, it’s not my property and I don’t want to be watering any more than I have to. The roses came around nicely with some water and Epsom salts.
The penstemon loved their rocky new habitat, but alas, the lavender bit the dust. A volunteer holly hock sprouted up in front and now I water that, too.
My new guerilla garden was looking lovely, but the molding still was peeling and the weeds in front of the garage still bugged me. I hired a homeless man to scrape and paint the molding and pull the weeds and quickly the vacant house looked lived in.
I'm planning on planting Fortissimo Daffodils, those giant yellow and orange ones, in the Fall along with some red tulips that will bloom after the daffs bow out. They'll be easy to spot from the street in the Spring, lending some color to an otherwise bland structure.
A heck of a lot of time and money for something that you don't own, you might think. Maybe. But the biggest payoff came when the appraiser, who was valuing my house because I refinanced my mortgage, hardly glanced at the well-kept house
next door. He just assumed that someone lived there.
How to Assemble an Inexpensive Rain Barrel by Mary Filosi
Materials required:
1. Tape measure.
2. Rubber trash can about 33 gallon size.
3. Screening material used for top cover, keep out mosquitos, critters, etc.
4. Something to fasten the screen to the barrel, like clips, bungee chord.
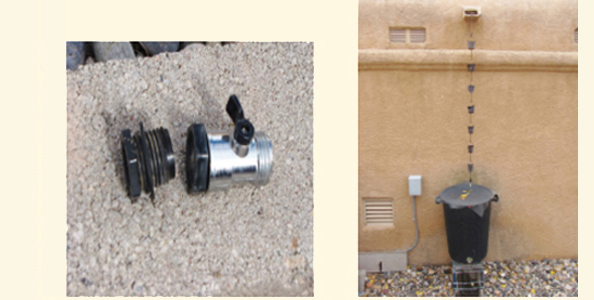
5. A “shut off coupling”.
6. An interior nut and rubber gasket which you will place on the inside of the barrel to connect to the outside coupling (see photo). I don’t usually find these items in 1 package. They may be seasonal items spring and summer at your nearby hardware store, near the parts for evaporative coolers.
7. 1" drill bit and drill to make the hole.
8. Rain chain to direct the water when it slows down. This prevents the water from hitting your wall/stucco.
9. A support stand of some kind to raise the barrel to the height you’d like (Dollar Store has plastic ones).
10. Large rock to place inside to stabilize from the wind.
11. Pipe thread sealant (“goo”).
Instructions:
1. Measure the inside of your arm, from your armpit to base of your fingertips at the palm. That measurement is
the length from the top of the barrel down toward the bottom where you will drill the hole with your 1" bit,
from the outside of the barrel of course. Why? Because you can’t tighten the inside nut/gasket to the outside
“faucet/coupling” unless you can reach it. Make sure you can comfortably reach it before you drill.
2. After you drill the hole, test that your connections are good, the placement is good, then optionally put some
pipe thread sealant around the exterior encircling the hole, that helps prevent it from leaking. Then make your connections permanent by hand tightening.
3. Assemble by placing the barrel on the stand, put your big rock in the center bottom, cut the screen 3"-4" wider than the top, and attach it to the top. VOILA! There’s your less-than-$25 rain collector.
Thank you for contributing to water conservation and our environment! Spread the word!
Check with the Albuquerque water conservation department to see if they will give you a credit on your next water bill.
You must keep the receipts of the cost of each item.